
Tuesday, September 10, 2013
Exciting news
I spoke to the listing agent for the house yesterday to check on the status of the sale, and she confirmed that the closing will take place in a couple of weeks. As soon as I have official confirmation that the house has a new owner and the next chapter of its history is finally underway, I will post the good news here!
Sunday, May 19, 2013
Looking ahead, part 5: The back yard
While I'm waiting with fingers crossed for news on the current offer on the house, I'd like to go outside and talk about the property.
The house at 920 Cedar Brook Road sits on a very, very large lot - large even by Plainfield standards, a city with several beautiful old historic districts and many large homes and properties. I don't know the exact lot size, but I do recall my mother saying it was nearly an acre and three-quarters. It may be slightly less, but I'm certain it's well over an acre.
As you can see from the photo at left, the front yard is deep and wide, with the house set well back from the street. It used to take me about an hour to mow it back in high school. (By the way, the long, original herringbone brick walk is still intact and level.) Right now, the landscaping is simple and somewhat formal - which suits the house. There are already a couple of newer trees, and there's also lots of space to add new planting beds for shrubs and perennials. The front yard extends to the end of the reddish brown fence, which is right next to the piazza.
The back yard, however, is really where the magic is waiting. There's so much space, so much privacy, and so many possibilities that words really can't capture it all. Hopefully some images will help.
The house at 920 Cedar Brook Road sits on a very, very large lot - large even by Plainfield standards, a city with several beautiful old historic districts and many large homes and properties. I don't know the exact lot size, but I do recall my mother saying it was nearly an acre and three-quarters. It may be slightly less, but I'm certain it's well over an acre.
 |
| View of the front yard, looking towards the neighbor's house. |
The back yard, however, is really where the magic is waiting. There's so much space, so much privacy, and so many possibilities that words really can't capture it all. Hopefully some images will help.
A tour of the back yard...
 |
| The back yard, looking up from the slope below the pool. This is only part of the whole lawn area - see the images below. There's another big part of the yard to the right, plus a separate lawn/garden space behind where I was standing when I took this picture. |
 |
| This shows more of the upper yard between the pool and the house. If you look beyond the glare streak (sorry), you can see there's a lot more yard to the right. It extends along the back of the fence that's visible in the front yard photo at the top of the post. |
 | ||
| There's a gentle slope leading from the back porch and side of the house down to the yard. We used to have wide timber steps at several points along the rise, and built-in flower beds that were filled with geraniums and trailing petunias every summer. |
 |
| The back lawn, below the pool, had a thick hedge of flowering shrubs that separated it from the main lawn above. There were also many more trees along the rear fence. To the right, you can see the side of the garage that opens to the yard. |
 |
| This is actually an old rock garden. It was there when we moved in and clearly already established for a long time. Rock gardens were very popular in the early 20th century, and I can't help but wonder if this one dates back as early as the 1920s or 30s. Just as a reference point - I was standing in front of the rock garden when I took the picture of the upper lawn (with the glare streak), above. |
 |
| Beneath this muddy and messy cover is a very well built pool that was well maintained for decades. The diving board supports are still intact at the deep end, as are the handrails. There are wide entry steps at the shallow end. |
 |
| Is it a fish? Or a pool tile? The answer is pool tile. I saw it in the grass near the pool when I was in the back yard taking photos, and couldn't help picking it up for safekeeping, and will happily return it to the new owners. Of course, it's not the first time a tile or two has come loose...when we were kids, it was great fun diving to the bottom to retrieve the "fish" so they could be reattached. |
...and some dreams for its future.
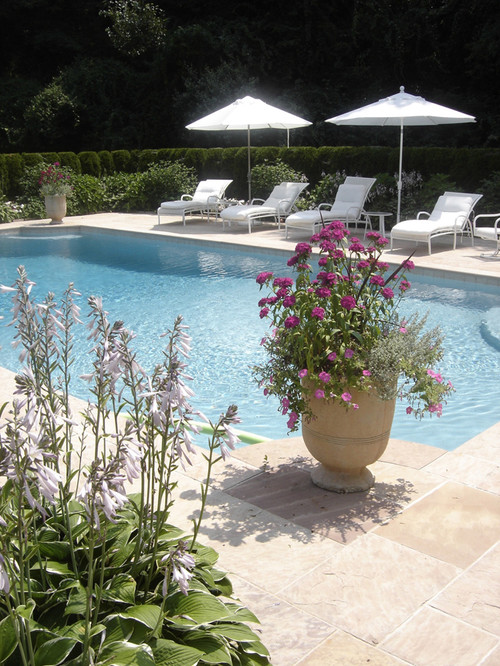 |
| We'll start with the pool. I love this image - the feeling of light, the depth behind the pool, the lounge chairs - it feels like the pool used to, only a bit more dressed up. The actual pool deck probably isn't quite this wide, but there's still lots of room for chairs, umbrellas, plants, etc. |
 |
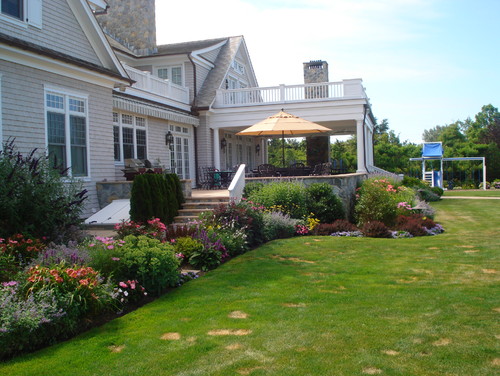
| The wide, sunny upper part of the yard near the piazza and along the wooden fence could feel just like this with a few new trees and thoughtful plantings. |
 |
| I imagine flower beds and shrubs wrapped around the back of the house, from the back porch to the piazza, much like this...except raised and tucked into the slope that leads up from the lawn. Obviously the house above has a different style and footprint but the design concept would still work, and would really set off the back of the house. |
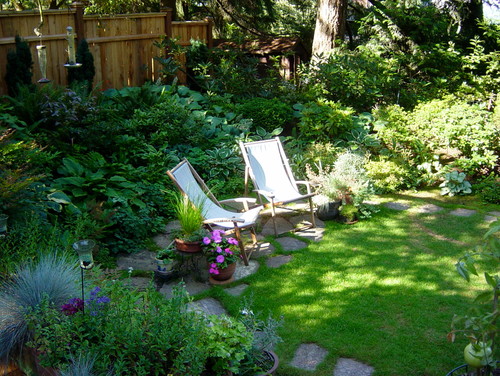 |
| This is exactly how the back garden used to feel...it was a lushly planted, shady space tucked between the garage and the fence at the edge of the property, with another high fence at the back for privacy. It was such a peaceful place to sit on a hot day. With a few mid-size ornamental trees and some nice shrubs, perennials, and grasses, I know the back garden could look like this again. |
 |
| And of course, the most important thing the back yard needs is a new magnolia. Our beautiful old magnolia sat midway between the pool and the main back section of the house, right behind the library windows. It was a favorite shady spot for our dogs in summer; in winter, it was hung with all kinds of bird feeders. And every spring, it blanketed the yard with thick, waxy pink petals. |
Tuesday, April 16, 2013
Looking ahead, part 4: The laundry
According to the 1920 census, the Huntsman household at 920 Cedar Brook Road included two full time housemaids. Among their many responsibilities would have been the laundry - which of course was done downstairs, in the basement. The laundry room was just below the kitchen, and as you can see from the blueprint below, had ample room for washing as well as air drying and ironing.
This was probably a very nice laundry room for its day. It's bright and well ventilated, and there was even a dedicated water heater, according to the blueprint. But washing machines were still only semi-automated in 1914, requiring a separate hand-cranked wringing process. And everything had to be hung to dry; the earliest electric and gas-fired dryers wouldn't be available for another 25 years. Easy care fabrics were also decades away, which meant hours and hours of ironing. The Huntsman family's clothes and linens would then be carried two flights up the back stairs and put away in the second-floor bedrooms and linen closet.
When my parents bought the house in 1968, laundry had become astonishingly easy in comparison. It was made even easier by moving the entire operation upstairs. Our washer and dryer were as much fixtures in the kitchen as the refrigerator and stove.
Keeping the laundry in the kitchen might still be just as convenient today. The kitchen is definitely big enough, and if laundry, cooking, and other family activities work best centered in one room, it's a very practical idea.
Moving up. However, I think there's another solution. Bring the laundry up to the second floor, and create a luxurious modern laundry room in the back wing, in what was originally the Sewing Room. It's a great functional space that served a variety of purposes when we lived in the house - from gift wrap central to general storage. More importantly, sometime in the late 1970s, my mother actually transformed it into a half bath so my grandparents would have a shorter trip to a bathroom when they came to stay with us. (They always slept in the lovely guest room at the end of the back wing.)
Logistics. I'm not sure if the fixtures my mother installed are still in place, but I do know there must still be plumbing access. The room is also nearly directly above where the washer and gas dryer were in the kitchen. So bearing in mind that I am definitely NOT an architect, contractor, or plumber, it seems like building a laundry room here is clearly possible.
Location. Location-wise, this room is perfect. It's just up the stairs from the kitchen. It's separated from the main second-floor bedrooms by a hallway door - so even late-night wash loads wouldn't disturb anyone. And putting away clean clothes would be incredibly convenient, especially compared to the two-story hike the maids used to make from the basement. It's bright, with two big windows overlooking the driveway, and it has tons of storage. (Note: I recall the radiator being on the left side of the windows, even though this version of the blueprints shows it moved to the right.)
Planning. Looking at the room layout above, I'm guessing a standard-size washer and dryer would fit nicely side by side in the alcove on the right as you
enter the room, maybe with room for a small utility sink. Or perhaps you could stack the washer and dryer; even build them into a cabinet with doors. The point here is that with a bit of thoughtful design, the room could be customized to create a wonderful laundry area for your 21st century family.
Inspiration. Here are some fun ideas from Houzz.com to help paint a clearer picture of what I'm trying to describe. (I think the maids would have liked them all.)
 |
| Original blueprint detail of the basement laundry. Image reprinted courtesy of the Local History Collection of the Plainfield Public Library, NJ. |
When my parents bought the house in 1968, laundry had become astonishingly easy in comparison. It was made even easier by moving the entire operation upstairs. Our washer and dryer were as much fixtures in the kitchen as the refrigerator and stove.
Keeping the laundry in the kitchen might still be just as convenient today. The kitchen is definitely big enough, and if laundry, cooking, and other family activities work best centered in one room, it's a very practical idea.
Moving up. However, I think there's another solution. Bring the laundry up to the second floor, and create a luxurious modern laundry room in the back wing, in what was originally the Sewing Room. It's a great functional space that served a variety of purposes when we lived in the house - from gift wrap central to general storage. More importantly, sometime in the late 1970s, my mother actually transformed it into a half bath so my grandparents would have a shorter trip to a bathroom when they came to stay with us. (They always slept in the lovely guest room at the end of the back wing.)
 |
| Original blueprint of the second floor. Image reprinted courtesy of the Local History Collection of the Plainfield Public Library, NJ. |
Location. Location-wise, this room is perfect. It's just up the stairs from the kitchen. It's separated from the main second-floor bedrooms by a hallway door - so even late-night wash loads wouldn't disturb anyone. And putting away clean clothes would be incredibly convenient, especially compared to the two-story hike the maids used to make from the basement. It's bright, with two big windows overlooking the driveway, and it has tons of storage. (Note: I recall the radiator being on the left side of the windows, even though this version of the blueprints shows it moved to the right.)
 |
| Original blueprint detail of second floor back hallway. Image reprinted courtesy of the Local History Collection of the Plainfield Public Library, NJ. |
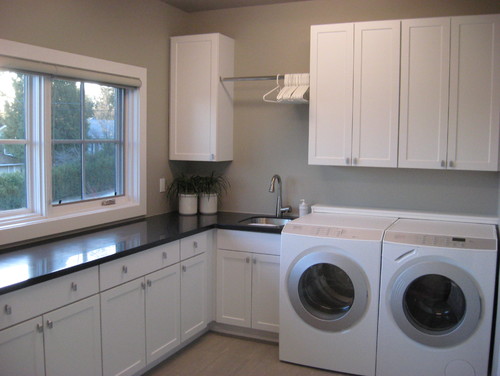
Inspiration. Here are some fun ideas from Houzz.com to help paint a clearer picture of what I'm trying to describe. (I think the maids would have liked them all.)
 | |
| What a fun place to do the laundry! I love the cabinetry and great use of wall space. |
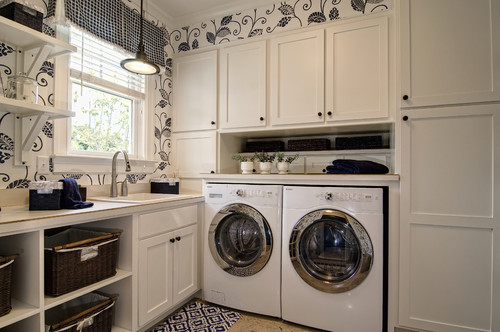
 |
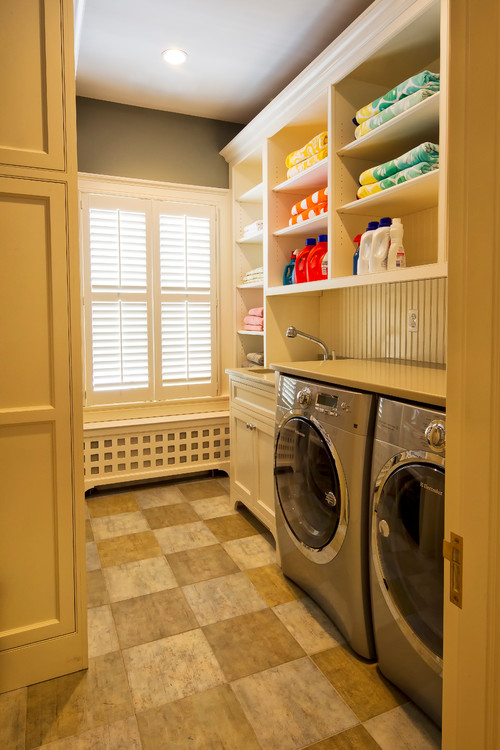
| This is simple but very functional. This is what I was envisioning with side-by-side appliances and utility sink. |
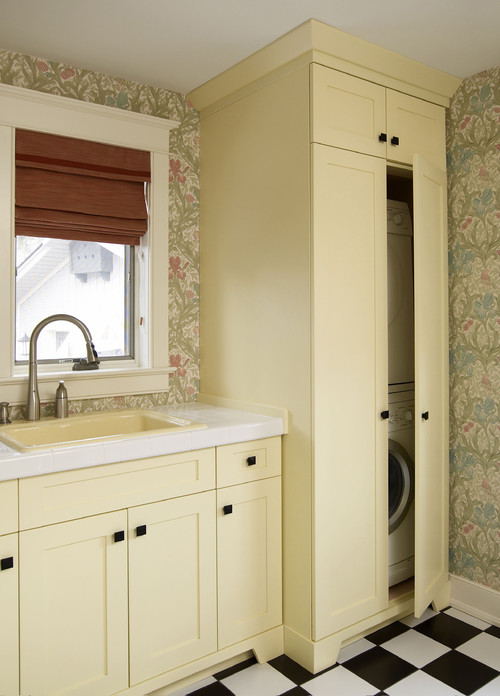 | ||
| This would work nicely if you shifted the appliances and sink over to the far right wall. You'd also have more open floor space in case you want to use the room for other activities or storage. |
 |
| This is amazingly close to the way the old Sewing Room feels, in terms of window placement and light. The room itself is much wider than this space. |
Sunday, April 14, 2013
Looking ahead, part 3: Rooms reimagined
If I miraculously won the lottery and could buy back my beautiful old house, I'd have a hard time deciding which rooms to update first. But the main living areas downstairs would be at the top of my list (after the kitchen, of course).
A fresh look at the first floor. Right now, the dark wall colors and border treatments in the library, living room, foyer, and dining room are really at odds with the home's classic Colonial Revival architectural details. But with some fresh, bright color schemes and design treatments, these rooms will absolutely sparkle again.
Up the stairs
I hope these ideas make it easier to envision just how beautiful 920 Cedar Brook Road can be...again.
A few additional notes...
- I recently rediscovered this link from the Plainfield Historic Preservation Society, which describes the architectural importance of Cedar Brook Road.
http://www.plainfieldnjhistoricpreservation.com/study_area_for_proposed_historic_districts.html
- And here's one of many good overviews available online about the history and architectural features of Colonial Revival homes:
http://www.antiquehomesmagazine.com/info.php?info_id=23
A fresh look at the first floor. Right now, the dark wall colors and border treatments in the library, living room, foyer, and dining room are really at odds with the home's classic Colonial Revival architectural details. But with some fresh, bright color schemes and design treatments, these rooms will absolutely sparkle again.
Library
 | ||
| The library now. This room looks a bit shabby here, but it has great potential. It has three windows, custom-built bookshelves, and plenty of room for two big chairs, a long couch and a TV. This was my mother's favorite room...she spent many contented hours here, surrounded by her beloved books and an army of Toby jugs. |
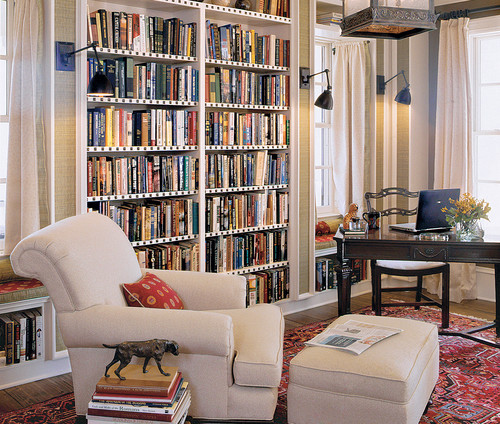 |
| The library reimagined. I found this library photo on Houzz...and fell in love with it. It's so easy to imagine the library at 920 Cedar Brook updated and brightened to feel just like this. There's definitely space to combine a desk similar to this one, as well as a nice-sized couch and several comfy chairs. |
 |
| The living room now. This black floral wallpaper was added recently, and makes the living room feel dark and closed in, despite four big windows and French doors on either side of the fireplace, and spacious room size (25' x 16'). The pattern and color also feel out of place against the clean, classical lines of the white woodwork. |
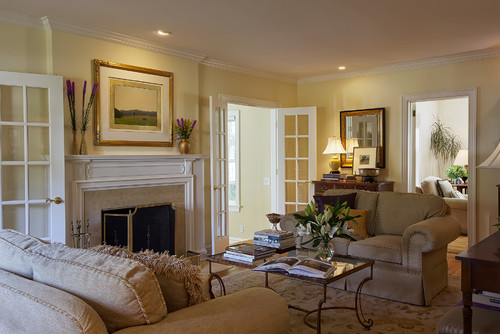 |
| The living room reimagined. Although pale blues, grays, greens or even a delicate, light-colored wallpaper would also work beautifully in this room, there's something about the brightness of a creamy ivory/beige scheme that feels very inviting and versatile - especially since the living room is so open to the foyer. |
 |
| The foyer and dining room now. The walls are a deep burgundy in both rooms, creating a similar somber effect as the living room, while also making the beautiful fluted and carved woodwork appear stark and oddly unrelated to the walls. The overall effect is a pretty depressing mash up of Victorian and Colonial. |
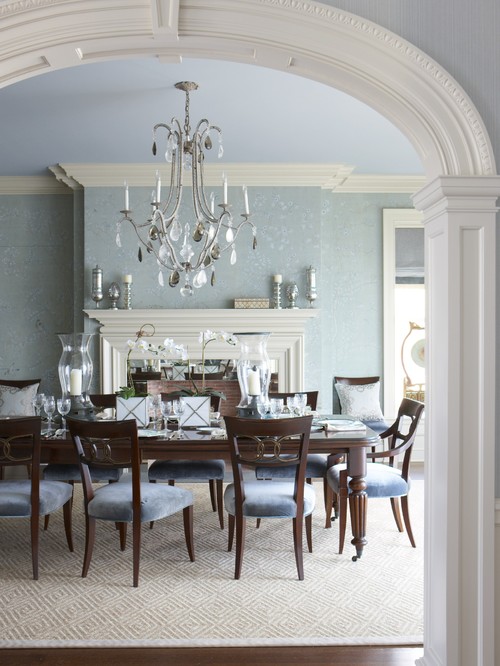 |
| The foyer and dining room reimagined. What a difference light makes! Although this concept is on the formal side, the pale blue is still so simple and refreshing against the white trim. And the woodwork is remarkably similar to 920 Cedar Brook. The fireplace is not in the same place as in this image; it's on the left as you enter the room. |
Up the stairs
 | ||
| The staircase now (front view). |
 |
| The staircase now (side view). |
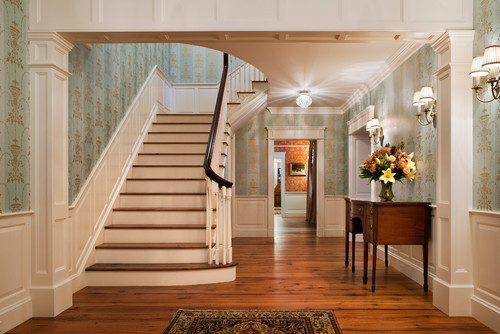 |
| Stairs and foyer reimagined. Obviously a very different room layout than the foyer at 920, but the staircase and surrounding woodwork share enough similarities that this image was irresistible. What I think is interesting to consider is the effect of a delicate traditional wallpaper, which really complements the proportions of the space and adds character without being overwhelming. |
I hope these ideas make it easier to envision just how beautiful 920 Cedar Brook Road can be...again.
A few additional notes...
- I recently rediscovered this link from the Plainfield Historic Preservation Society, which describes the architectural importance of Cedar Brook Road.
http://www.plainfieldnjhistoricpreservation.com/study_area_for_proposed_historic_districts.html
- And here's one of many good overviews available online about the history and architectural features of Colonial Revival homes:
http://www.antiquehomesmagazine.com/info.php?info_id=23
Friday, March 29, 2013
Looking ahead, part 2: The kitchen
When you visit 920 Cedar Brook Road, the realtor will likely take you into the house through the door at the side porch.*
You'll step into the long side hall that leads to the foyer. But if you stop and turn right just after entering the house, you'll be in the butler's pantry, and a few feet later, find yourself in the kitchen.
 Right now, this is what you'll see. A big open space, with room for a large center island or table. An adjoining breakfast room that's already partly open to the kitchen. Five windows, if I'm counting correctly. Not visible in this image are also two big closets, two separate doors to enter and leave the room, plus the back door leading to the porch. (The other kitchen door opens to the back staircase.)
Opposite the view here, there's a long wall with two windows flanking the chimney. This is where my mother installed her tireless avocado green Caloric gas stove right after we moved in. Next to the stove were the equally hard-working (and yes, avocado green) Maytag washer and dryer, all circa 1970. (I think we called the Maytag man maybe two or three times over 30 years??)
But back to reality. Right now the kitchen is clearly in need of a fresh start. So let's clear away the dated wallpaper and dustiness and think: What can this space become? What could you create here? Here are a handful of beautiful idea starters, courtesy of Houzz.com.
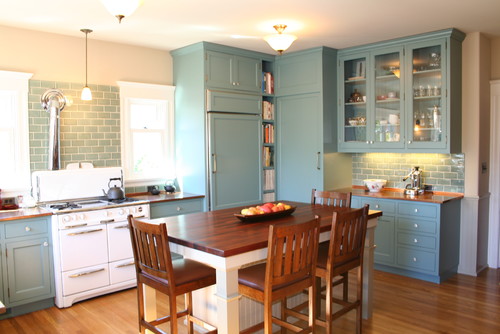
Idea #1: Classic warmth. I love this kitchen. Stylistically, it's such a wonderful fit for the house, and it would blend almost seamlessly with the existing butler's pantry. Obviously the kitchen at 920 has a different layout, but many of these elements would work perfectly, just shifted around a bit.
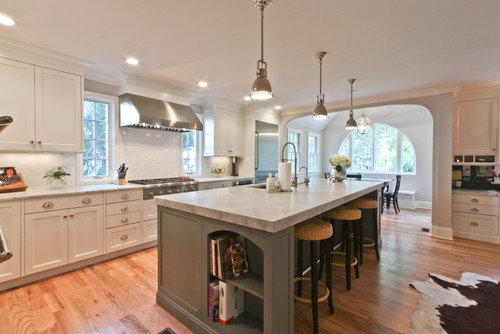
Idea #2: Colorful and comfortable. If you wanted to do something with a little more pizzazz, maybe more of a blend of new and traditional, here's another really pretty kitchen. It has such a timeless Wedgwood blue color theme and the cabinet/drawer style is a nice match for the butler's pantry. There is definitely room for a table or island this size.
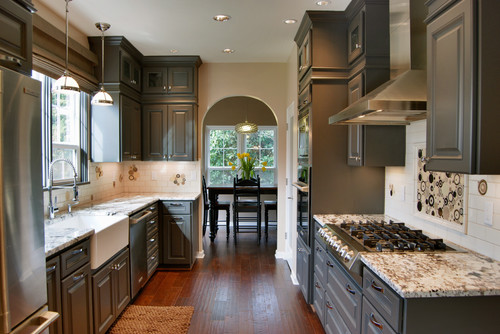
Idea #3. Sleek and open. If the counter that now holds the sink and dishwasher were removed, the main kitchen area would flow right into the 8' x 10' breakfast room beyond, creating a large, open, light-filled space like this. Again, the layout of appliances is different. I think the stove has to stay on the opposite wall. But the little counter/cabinet area at the far right would definitely work, and in a similar spot.
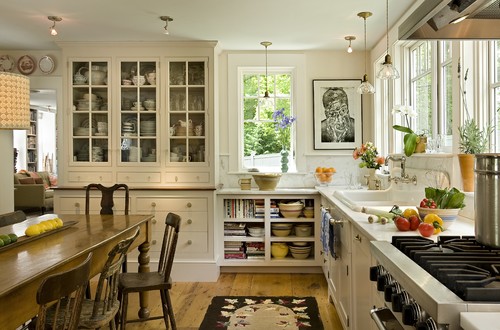
Idea #4. Colonial charm. Maybe it's the green that makes this one feel so right (too many years of avocado appliances, I guess). You'll have to use your imagination to push the walls apart and see this working on a wider scale (the kitchen is 15' wide). But I love the farmhouse sink, the light coming from the window at the left, and the general sense of warmth. This kitchen would be right at home on 920 Cedar Brook Road!
Contemporary Kitchen by Portland Kitchen And Bath Jason Ball Interiors, LLC
*Just as a reminder: I can recommend an excellent local resource who knows 920 Cedar Brook very well, and would be happy to walk you through the house. Please email me for details.
You'll step into the long side hall that leads to the foyer. But if you stop and turn right just after entering the house, you'll be in the butler's pantry, and a few feet later, find yourself in the kitchen.
 Right now, this is what you'll see. A big open space, with room for a large center island or table. An adjoining breakfast room that's already partly open to the kitchen. Five windows, if I'm counting correctly. Not visible in this image are also two big closets, two separate doors to enter and leave the room, plus the back door leading to the porch. (The other kitchen door opens to the back staircase.)
Opposite the view here, there's a long wall with two windows flanking the chimney. This is where my mother installed her tireless avocado green Caloric gas stove right after we moved in. Next to the stove were the equally hard-working (and yes, avocado green) Maytag washer and dryer, all circa 1970. (I think we called the Maytag man maybe two or three times over 30 years??)
But back to reality. Right now the kitchen is clearly in need of a fresh start. So let's clear away the dated wallpaper and dustiness and think: What can this space become? What could you create here? Here are a handful of beautiful idea starters, courtesy of Houzz.com.
Idea #1: Classic warmth. I love this kitchen. Stylistically, it's such a wonderful fit for the house, and it would blend almost seamlessly with the existing butler's pantry. Obviously the kitchen at 920 has a different layout, but many of these elements would work perfectly, just shifted around a bit.
Idea #2: Colorful and comfortable. If you wanted to do something with a little more pizzazz, maybe more of a blend of new and traditional, here's another really pretty kitchen. It has such a timeless Wedgwood blue color theme and the cabinet/drawer style is a nice match for the butler's pantry. There is definitely room for a table or island this size.
Idea #3. Sleek and open. If the counter that now holds the sink and dishwasher were removed, the main kitchen area would flow right into the 8' x 10' breakfast room beyond, creating a large, open, light-filled space like this. Again, the layout of appliances is different. I think the stove has to stay on the opposite wall. But the little counter/cabinet area at the far right would definitely work, and in a similar spot.
Idea #4. Colonial charm. Maybe it's the green that makes this one feel so right (too many years of avocado appliances, I guess). You'll have to use your imagination to push the walls apart and see this working on a wider scale (the kitchen is 15' wide). But I love the farmhouse sink, the light coming from the window at the left, and the general sense of warmth. This kitchen would be right at home on 920 Cedar Brook Road!
Contemporary Kitchen by Portland Kitchen And Bath Jason Ball Interiors, LLC
*Just as a reminder: I can recommend an excellent local resource who knows 920 Cedar Brook very well, and would be happy to walk you through the house. Please email me for details.
Saturday, March 23, 2013
Looking ahead
 |
| Front yard view of piazza, April 2012. |
 |
| Original parquet floor detail, side hall. |
Part 1: An architect's perspective.
I've often wondered what potential buyers are thinking when they first walk in the door. But lately, I've also tried to imagine some of the questions they'd have. Where would I start, if were the new owner of this elegant 14-room house? How would I identify which projects were most important? How could I be sure the changes I made were right for the original structure - and would also preserve my investment for the future?
I decided to look for someone who could help me address questions like these, and recently, talked to an architect with years of experience renovating historic homes in New Jersey.
Susan Rochelle, AIA, was kind enough to review this blog, and then chat with me by phone about some general guidelines she follows when updating older and historic homes. First of all, she says, "the best older house to buy is one where very little has been done to it." This saves a huge amount of time and trouble down the road - because you're not doing things like replicating missing woodwork or pulling layers of linoleum or vinyl flooring off original hardwood floors. As mentioned above, remarkably little has changed inside 920 Cedar Brook since 1914....as far as I know, the only missing features are some of the original first floor and hallway light fixtures, and the French doors to the library. (I've already begun trying to track down sconces that are a better fit than those in place right now - see notes at bottom of this post.)
In addition, Susan offered some practical tips about where to start as the next caretaker of a historic home. Step one, she says, is "to make sure the house is water tight. If there's any doubt about the roof, make the necessary repairs. This is essential for protecting your investment in everything else you do inside the house." My parents replaced the roof around 1990, as I recall, and when I was in the house a year ago, I did not see any current signs of water issues - but Susan's advice is obviously wise.
She also stressed the value of making sure the siding is properly painted, as this will protect the wood substrate from the effects of moisture. I have to be honest here - a new paint job is clearly overdue for 920 Cedar Brook. The current yellow color is new in the last 10 years, but it does not appear to have been done very well, and is already peeling and chipping. Yes, repainting a big house is a big job, but replacing the siding would be a much bigger one.
Susan's philosophy about updating period homes was also helpful to hear. Even in old homes, she said, "we still have to modernize. We want the things we want, in order to live comfortably and efficiently. But there are good ways to modernize, and there are bad ways." The key, she believes, is to be sensitive to the home's character and original structure in planning and executing upgrades. In her experience, working with professionals who clearly understand the home's construction will help to minimize how much disturbance is made to its existing fabric, and keep both old and new elements harmonious.
I am very grateful to Susan for taking time out of her busy practice to talk through my questions, and hope you'll check out her Web site at http://www.susanrochellearchitect.com. There's a lot of great information on it, as well as examples of many kinds of renovation projects.
 |
| Foyer, view of upper front door detail, November 2011. |
After that, we'll go outside. This is such a huge property, with so much potential. Nearly empty of trees and shrubs now, there are many ways the grounds can be transformed into lush, beautifully planted spaces that surround and complement the house.
A quick word about the light fixtures...
Okay. I will admit I'm still having a hard time getting over the fact that the original light fixtures, especially the beautiful, neoclassical torch sconces that used to adorn the columns in the foyer, were replaced with shiny, lacquered, Victorian-ish lights that (no offense, but seriously) you can probably buy right off the shelf at your local Home Depot. It's just plain wrong.
 |
| Original sconce, foyer. |
A more logical and accessible option is Rejuvenation.com, one of my favorite period home resources. I discovered tonight that the Rejuvenation site even has a blog post about Colonial Revival era lighting: http://blog.rejuvenation.com/stories/a-century-of-lighting-styles-colonial-revival-part-1.
 |
| Fields Classic Torch wall bracket, Rejuvenation. |
Meanwhile, I'll be watching Ebay and hoping I hit the vintage Colonial Revival light fixture jackpot.
Thursday, March 14, 2013
Blueprint for a Colonial Revival garage
Like many garages of its era, the garage for 920 Cedar Brook Road was sited at the back edge of the property. It was designed at the same time as the house, so it shares similar colonial revival architectural details. And like the house, it's large. It's a two-story building, with a spacious ground level footprint that would have accommodated two sizable 1910s-era automobiles. Sometime later, an additional single-story bay was built, increasing the capacity to three cars. (The drawings below show the original configuration.)
The garage's heavy sliding doors, detailed with inset panels and small windows across the top, still moved smoothly enough for adventurous children to operate in the 1970s. But we actually preferred to slip in and out through the "secret" hinged opening that was built into the left-hand door panel (see blueprint detail, below).
Inside, the garage was just as much of an adventure. An enclosed staircase at the rear led up to the second floor, where a wood-paneled room was apparently used by the chauffeur during the day (see second floor detail of "Man's Room," below). A huge double window opened onto the garage space below, and the room itself was large enough for perhaps a bed, chairs and table. There is also a built-in closet, and as you can see from the chimney, the garage was once heated.
By the late 1960s, when my parents moved in with two cars and three small children, they found it more practical to park in the driveway, and the garage became more of a storage space for lawn equipment and bikes. But imagine the vehicles that must have rolled out of that elegant old building back in the day. Summoned by a phone or bell, the chauffeur would have donned his cap and warmed up a beautiful Packard or other fine automobile from the period, and headed up the drive to collect members of the Hunstman family at the covered side entrance of the house.
Sadly, the old garage has fallen on hard times. Garages from the early part of the 20th century era are fragile structures, and finding an original one still standing is somewhat miraculous, according to the research I've done. So while this one will need to be rebuilt, the good news is that because the blueprints exist, it can be restored faithfully. In addition, I suspect that many of the original materials inside - paneling, interior and exterior windows, steps and doors - can be salvaged and repurposed.
With a little thought and effort, I believe this little gem of automotive architectural history, designed with just as much care and attention by Messrs. Marsh and Gette as the main house itself, can be successfully recreated and shine again.
 |
| Original drawings for the two-story garage at 920 Cedar Brook Road. The door in the side elevation (top right, first row) opens into the back yard. Image reprinted courtesy of the Local History Collection of the Plainfield Public Library, NJ. |
 |
| Detail of main garage doors. Note hinged panel at left, which is accessed by a small inset lock. Image reprinted courtesy of the Local History Collection of the Plainfield Public Library, NJ. |
Inside, the garage was just as much of an adventure. An enclosed staircase at the rear led up to the second floor, where a wood-paneled room was apparently used by the chauffeur during the day (see second floor detail of "Man's Room," below). A huge double window opened onto the garage space below, and the room itself was large enough for perhaps a bed, chairs and table. There is also a built-in closet, and as you can see from the chimney, the garage was once heated.
 |
| Second floor garage detail. Image reprinted courtesy of the Local History Collection of the Plainfield Public Library, NJ. |
 |
| Side porch entrance, April 2012. |
Sadly, the old garage has fallen on hard times. Garages from the early part of the 20th century era are fragile structures, and finding an original one still standing is somewhat miraculous, according to the research I've done. So while this one will need to be rebuilt, the good news is that because the blueprints exist, it can be restored faithfully. In addition, I suspect that many of the original materials inside - paneling, interior and exterior windows, steps and doors - can be salvaged and repurposed.
With a little thought and effort, I believe this little gem of automotive architectural history, designed with just as much care and attention by Messrs. Marsh and Gette as the main house itself, can be successfully recreated and shine again.
Thursday, March 7, 2013
Downstairs, upstairs
Here is the next set of blueprints for 920 Cedar Brook Road.
As mentioned in the previous post, the original drawings don't completely match the house as it was built. There were once some very grand plans for a two-story porch at the rear, and an additional third-floor bedroom was supposed to open off a hallway at the top of the main staircase. For reasons we will never know, those ideas were not approved by the Huntsman family, and the design for the rear of the house was scaled back.
Regardless of who slept there, the room behind the kitchen is no longer a separate space. As you can see in the image above, the walls have been removed, courtesy of a remodeling project completed by my parents in the early 1980s. The kitchen itself is already a very large room (15'8" x 14'10")...with the extra 10'2" x 8'2" included, it's huge space, full of light and possibilities. And yes, it's due for an update. But it could be such a showplace! Note in the drawings that it includes two very large closets, one of which was used to keep foods cold before modern refrigeration. And just to update the status of the "Servant's Porch," as it's noted in
the drawings, this is actually just a regular (but very nice) back
porch. It's one of the two main access points to the back yard.
The butler's pantry, just off the kitchen, still has its original built-in glass front cabinets and large copper sink. I imagine this was used to store china and silver, as well as to organize food before it was brought into the dining room. The Huntsman family, of course, would have summoned their next course via the buzzer plate on the floor, which was wired into the kitchen signal box. (Not quite Downton Abbey but still a lovely remnant of a forgotten American lifestyle...and lots of fun for children to play with in later decades.)
Moving up. As you explore the second floor, you'll see that the master bedroom is labeled "Owner's Room," and has adjoining rooms on either side that open directly to the main hall. It includes a very large dressing closet with a mirrored door and large bath. Down the hall is the other main bedroom, labeled "Mother's Room." According to the 1920 Census records, Mrs. Maud Huntsman's mother lived with the family during this period; I don't think it's a crazy guess to imagine that this room may have been built for her. It also has its own private bath.
What's missing, however, is the "Sleeping Porch," that would have opened off the back hall. There's just a normal window there now, but the sleeping porch seems like such a romantic idea. I imagine it would have been screened, and filled with the scent of flowers from the backyard below on warm summer evenings.
The back wing held the children's play area and sewing room. The playroom is actually a bright and cozy bedroom now, and the sewing room could easily be re-purposed into anything you imagine - an office, studio/crafts room, family room, or a sunny, spacious laundry room.
From the top. Up on the third floor, there are three more rooms - the large "Guest Room" (mine, growing up) and two charming smaller ("Servant's") rooms. There's also a huge cedar closet (labeled "Storage Room,") and two full baths - each with an original deep soaking tub. As mentioned before, the "Boy's Room" at the back, does not exist. This would apparently have been built above the sleeping porch. There is also only one main hallway, right off the top of the stairs. A small closet was placed where the opening to that imaginary rear hallway would have been.
You should visit the house in person to see its final design! I
can recommend an excellent local resource who knows the house well and
would be happy to guide you.
As mentioned in the previous post, the original drawings don't completely match the house as it was built. There were once some very grand plans for a two-story porch at the rear, and an additional third-floor bedroom was supposed to open off a hallway at the top of the main staircase. For reasons we will never know, those ideas were not approved by the Huntsman family, and the design for the rear of the house was scaled back.
 | ||
| Original rear elevation for 920 Cedar Brook Road. Image reprinted courtesy of the Local History Collection of the Plainfield Public Library, NJ. |
 |
| Rear elevation, April 2012. The final blueprints were modified to this much smaller porch design. The drawing above proposed a large two-story porch, as well as more elaborate windows on the upper floors. |
Of course, the home's final layout is still abundantly spacious. It includes five bedrooms on the second floor, another huge family bedroom on the third floor, plus the two smaller "Servant's Rooms" on the third floor. And according to the drawings, there was once another servant's room on the first floor. This was adjacent to the kitchen, and included a built-in dresser. Was this room used by the cook? The chauffeur? We'll never know, but it's fun to wonder.
 |
| Detail from first floor plan for 920 Cedar Brook Road. Interesting that both a coal range and a gas stove were specified in the kitchen. Image reprinted courtesy of the Local History Collection of the Plainfield Public Library, NJ. |
 |
| Kitchen view, November 2011. Most of the original cabinets and drawer fronts are still present, with some stripped and/or refinished. |
 |
| The back porch, April 2012. |
 |
| Butler's pantry, Nov. 2011. |
The butler's pantry, just off the kitchen, still has its original built-in glass front cabinets and large copper sink. I imagine this was used to store china and silver, as well as to organize food before it was brought into the dining room. The Huntsman family, of course, would have summoned their next course via the buzzer plate on the floor, which was wired into the kitchen signal box. (Not quite Downton Abbey but still a lovely remnant of a forgotten American lifestyle...and lots of fun for children to play with in later decades.)
Moving up. As you explore the second floor, you'll see that the master bedroom is labeled "Owner's Room," and has adjoining rooms on either side that open directly to the main hall. It includes a very large dressing closet with a mirrored door and large bath. Down the hall is the other main bedroom, labeled "Mother's Room." According to the 1920 Census records, Mrs. Maud Huntsman's mother lived with the family during this period; I don't think it's a crazy guess to imagine that this room may have been built for her. It also has its own private bath.
What's missing, however, is the "Sleeping Porch," that would have opened off the back hall. There's just a normal window there now, but the sleeping porch seems like such a romantic idea. I imagine it would have been screened, and filled with the scent of flowers from the backyard below on warm summer evenings.
 | |||
| Detail from second floor plan for 920 Cedar Brook Road. The sleeping porch was never built. Image reprinted courtesy of the Local History Collection of the Plainfield Public Library, NJ. |
The back wing held the children's play area and sewing room. The playroom is actually a bright and cozy bedroom now, and the sewing room could easily be re-purposed into anything you imagine - an office, studio/crafts room, family room, or a sunny, spacious laundry room.
 |
| Third floor tub. 1970s yellow-orange paint (sorry). |
 |
| Detail from third floor plan for 920 Cedar Brook Road. The design for the rear boy's bedroom was eliminated prior to construction. Image reprinted courtesy of the Local History Collection of the Plainfield Public Library, NJ. |
Subscribe to:
Comments (Atom)